Anchor for increased Accuracy

All archers need an unchanging anchor point for their draw hand, a location on or below your chin to ensure you have a consistent starting point for your hand and string. One of my Tumbler followers, Andy, asked…

…Since I’m just an amateur with the bow and don’t have any training… why you and archers in general, when they stretch to the full pose, set the hand that is stretching the string with the arrow bellow the chin? That helps for a better accuracy shoot? or is because the type of bow?(sorry I don’t know any terminology if you can help me with that too it would be cool). Thanks for the help…

There are four basic locations for an anchor point; under-the-chin, beside the face, over-hand anchor, and floating anchor, all have there pros and cons depending on your shooting style.

Under the Chin      

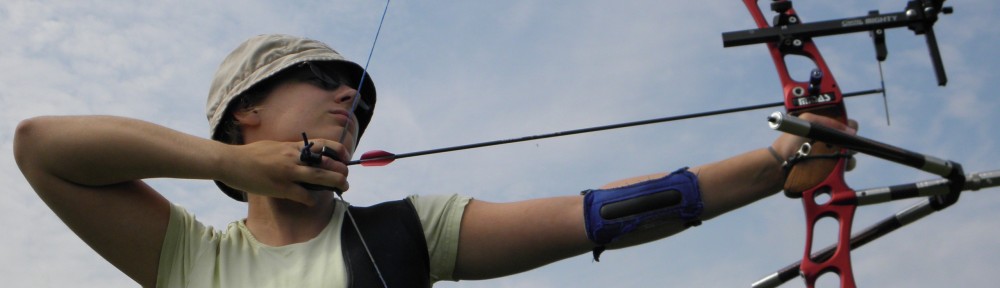
Draw the string to the center of the nose and middle of chin. A good anchor point consists of an unchanging triangle with the string touching the center of your nose and the center of your chin and your thumb tucked squarely under your jaw line and the shelf of your index finger riding along your jaw. (Alternatively string to the side of nose and the corner of your mouth however this is typically less accurate for recurve archers and better for peep sight usage on compounds.)

  • Advantages: This anchor has multiple touch points for triangular consistency and helps avoid overdrawing.
  • Disadvantages: It takes a little longer to position and master, and can be less comfortable depending on the archer.

Side of Face

Typically the string is drawn back until the tip of the index finger is at the corner of the mouth with the hand tight against the face. Some archers tuck their thumb under their jaw.  Depending on the tournament, some archers can face walk for difference distances. (move your hand up and down on your face)

  • Advantages: Anchor style can be established quickly and allows bare-bow to sight down the arrow shaft.
  • Disadvantages: This style is not typically as precise as under the chin and sometimes leads to plucking the arrow string.

Over-hand (Mechanical Release)

Typically over-hand is associated with a mechanical release. Mechanical release aids offer less interference with the string and are most commonly used by compound shooters and hunters. When having an over-hand release for a compound shooter you would have either your knuckle(s) or your thumb touching behind the corner of your jaw.

  • Advantages: Very accurate and it allows your elbow to align with the arrow at release
  • Disadvantages: Takes longer to set and position and a release aid needs to be setup based on the individual archer. Also since it very accurate scores are VERY high in competition and you have less room for error.

Floating Anchor (or partly floating)

A floating anchor is another option for some archers, the shape of some people’s jaw can make it difficult to do an under the chin anchor position. Some people take this position literally and have their hand floating in the middle of nowhere; this is really hard to make consistent because you have no point of reference to make the anchor position easily repeatable. However, you could go with a ‘partly’ floating anchor where you can have your hand touching a point of your jaw (or more if you can).

  • Advantages: Can provide an easier anchor point  for people with wider jaw lines.
  • Disadvantages:  Typically, not as consistent or as easily repeatable.

The anchor needs to be consistent and repeatable  on every shot. Some tips include…

  • Keep your head straight and still and bring the string to you so you can easily make your anchor and draw length consistent.
  • Chewing bubble gum, talking, or even moving your chin will result in inconsistent shots and therefore lower scores since you are changing the angle of the string as our jaw moves.
  • Keeping your shoulders relaxed and in their sockets and pointing your draw arm directly behind you.
  • Check your string alignment by matching the blurred image of the string in relation to the bow’s riser.

You will want to establish as many touch points as you can manage to help develop the most consistent anchor. A great consistent anchor leads to a happier more consistent archer.

Vision – Glasses, Contacts and Archery

Being an archer, competitive or recreational, does not require perfect 20/20 vision. E Perez asked…

I’m not sure if you’ve worn glasses before but if so, do you have any suggestions on archers who used glasses and are now switching to contacts? I’ve recently switched from glasses to contacts and my aiming is way off!

I can relate to this question, when I started shooting I had 20/20 vision, and around high school I needed glasses. I have not tried contacts yet, however it was an adjustment. Remember, the purpose of a corrective lens helps refract the light or images into in focus so you can see. Check out this website that explains how your vision works and how corrective lenses affect vision.

Wearing glasses or contacts can sometimes be a challenge for archers, since we actually stand to the side of the bow, not directly behind it. Therefore we are always viewing things on an angle, add the complexity of a corrective lens and it may be difficult to clearly focus on the target. It depends on the strength and thickness of the corrective lenses. I have a friend who can not shoot with her contacts on. The angle of the bow, combined with the angle of her contacts and she can not see her string alignment at all, which can affect your group.

Picking glasses out also presents a challenge because of the angle of the lenses and the thickness of the frames. My sister can not shoot with her prescription glasses because the frames are too large for the angle of the bow and she can not see her string alignment. If you need corrective lenses, it may take some trial and error experimenting to find out what works best for you.

I’ve recently switched from glasses to contacts and my aiming is way off!

If you are able to see the target and string alignment in focus, consider your arrow groupings.

Groups open up: Your brain could be simply catching up with your new perception, give it some time and practice. If the groups do not get better, then try shooting with your glasses on again and comparing the results.

Groups still tight; just off center: Move the sight. Even the smallest change can affect everything else, your vision is a large change.

Moved your sight; no change: Check your form, since many things can affect your your arrows including plucking the string.

Vision is important however not as important as good form. In fact, you may have read my earlier blog about legally blind South Korean archer, Im Dong-hyun, who broke the world record at the London 2012 Olympic Games. Im Dong-hyun has only about 20% vision in his right eye and only 10% in his left eye.

Your eyes can deceive you, don’t trust them – Obi-Wan Kenobi Star Wars

Your vision is important, however you may want to focus on making sure the shot “feels” the same every time, this is the key to success. For me, my coach still insists everyone warm-up with the following exercise to help us focus on feel not vision.

Close-Open-Close Warm-up 

  1. Close your eyes and draw your bow to full draw; focusing on your form. Try to make sure all your muscles and bones are in the same position with the same amount of pressure
  2. Quickly open your eyes to move the sight to the target
  3. Close your eyes and then shoot.

I hope I have provided some guidance and answered your question. If any other readers have experienced changes from moving to contacts from glasses, we would love to hear from you.

Archery Ballistics

Recently, I invited you, my readers, to ask me any questions you have about archery and you responded. Over the next couple of blogs, I will try answer all of these questions to the best of my ability. I decided to answer the one I know the least about first. Although I am not into hunting, I am not against the practice if you are going to use the entire animal. Also, in my opinion, an animal deserves a quick humane kill and not left just wounded walking around in pain. David Roberts asked…

I’d be interested in seeing your take on ballistic; specifically focusing on achieving maximum momentum (e.g. A lightning fast arrow with the weight of a feather vs. a slow moving heavy clunker). Are there any equations for calculating the “perfect” arrow for inflicting the most damage on its target? It would have to involve the power of the bow, the weight of the arrow and the relation between the two. Is a 400 grain arrow traveling at 300 fps more damaging than a 700 grain arrow at 235 fps? Less?

For target shooting faster shots means less drop & better accuracy, but for us archery hunting folks a “perfect” arrow is one that is has the exact weight that will provide the most possible momentum of that arrow. You go into a sporting goods store and you see all the arrows advertising super light weight and giving performance metrics in the amount of energy that they transfer when they strike. That metric is the wrong one to use when looking for a damaging arrow. A damaging arrow doesn’t want to put x amount of kinetic energy into a target over the course of 2 inches, it wants to put x amount of kinetic energy into a target over 3 feet. Momentum calculations would pr

ovide that. I understand that you’re not really into the hunting with archery (I think?) and that this topic isn’t really beneficial to competition shooting at all, but for real world applications of archery it’s one of the most important topics around.

My understanding is hunting is about the kill and understanding arrow flight will help you make the most of the opportunities that are presented while in the bush.  There are two planes of accuracy that you need to be aware of; Horizontal (left – right) axis and Vertical (up – down) axis.

The horizontal arrow flight is managed through good proper form and the understanding about the effects of nature elements such as weather conditions. Check out my earlier blogs about the various effects.

The vertical arrow flight is tougher since all arrows fly on a parabolic course. Frequently misses are high and low since it is hard to judge the arc of your arrow flight for unmarked distances.

Parabola in mathematics, a parabola is a conic section, created from the intersection of a right circular conical surface and a plane parallel to a generating straight line of that surface. Another way to generate a parabola is to examine a point (the focus) and a line (the directrix). The locus of points in that plane that are equidistant from both the line and point is a parabola. – Wikipedia

Example. If you kick a soccer ball (or shoot an arrow, fire a missile or throw a stone) it will arc up into the air and come down again …… following the path of a parabola! (Except for how the air affects it.) – Math is Fun

Some bow hunters choose to use a 3-pin sight so they can guess better. By pre-sighting distances of 20, 40 and 60 yards as examples, it allows them to better judge the best impact for the kill zone between these sight marks.

Ballistics is the science of mechanics that deals with the flight, behavior, and effects of projectiles – Wikipedia.

Since the question is specifically about ballistics, understanding all components of a hunting arrow will help you select your “perfect” arrow configuration. There are a lot of variables to consider, here is a list of things to consider, I found on the following website

  • Shaft size (diameter and wall thickness)
  • Shaft length (+/- 3⁄4 to one-inch can significantly change shaft stiffness)
  • Weight of the broadhead to be shot (+/- 25 grains can significantly change shaft stiffness)
  • Draw weight of the bow (+/- 2.5 to five pounds can significantly change shaft stiffness)
  • Archer’s draw length (certain shafts become significantly weaker when cut past 28 inches)
  • String material (Dacron strings are slower and require a slightly softer arrow, for example)
  • Type of bow (recurve or compound with a wheel, soft-cam or speed-cam)
  • Finger or mechanical release (finger shooters require a slightly stiffer arrow)
  • Bow length (bows less than 40 inches in length require a slightly stiffer shaft)
  • Overdraw length, if used (three-inch-plus overdraws require a slightly stiffer arrow)

You can review my Arrows – The Series for details about most of these.

Faster shots means less drop & better accuracy” is true for all archers. Since, for example, at 150 fps, there is an 8” drop in trajectory at just 10 yards versus only 5 inch drop at 200 fps, there are benefits to maintaining a higher velocity. This allows you to shoot from farther away and better judge the curve; giving you more opportunities.

To continue, assuming all things are perfect, longer draw length or heavier draw weight should produce higher kinetic energy, momentum, and velocity that will result in deeper penetration. It also offers more choices in selecting your broadhead. My understanding is for small game, where penetration is not the issue you can use field tips. However for larger game and for a quick kill you need the proper broadhead choice as well as the proper arrow selection. Since, the weight of broadhead is the ballast of the arrow, and when we are talking about hunting you may need to start here.

A broadhead weight can range from 85 grain and can be more than 140 grains and the number of blades is important since more blades increase the wind resistance causing greater dive. I am not an expert about broadheads however I know you can select from various types including fixed blades and mechanical blades. You can also check out this video I found about types of broadheads and this website for the pros and cons of each. I also ran across these two websites about penetration of various different broadheads. (Wibowhunters and Bowonlyoutdoors). Once you have selected your style of broadhead, you can properly select the arrow to match your bow to maximize your velocity and penetration.

If you really want to understand the technical details of an arrow ballistics, arrow parabolic course and the calculations; check out this website. However I am not a math major and If you are like me that is far too technical. So for specific arrows and bow configurations including total momentum, there are several options available including online ballistics calculators such as Outdoorsden OR Peteward. You can also purchase highly rated archery applications such as The Archery Program Pro by Tony Virnoche and OnTarget!2 Software for Archers by Pinwheel Software that provide more than just ballistics information. Lastly if you are mobile user there is a phone/android application called Archery Ballistics that you can carry around with you to the sporting goods store to help you make your selections.

Remember every setup is different and changing even one thing can effect everything else. You will need to spend time with the calculators and trying various combinations until you find the right one for you and your bow.

Although, I am not into hunting I hope that I have been able to answer your question and provide some high-level direction.

Shooting with a Clicker

Every competitive Olympic recurve archer uses a draw length checker or “clicker”. A clicker is a device that assists an archer to draw their bow consistently.  The clicker rides along the side of the arrow and produces a “clicking” sound after it passes over the point, hence the name “clicker”. By consistently measuring the draw length of the arrow, you get a consistent power off the bow and therefore a more consistent grouping of arrows resulting in better scores.

There is a lot of debate of when you should start to use a clicker. Anyone who wants to advance and develop smaller groups should start using a clicker as soon as possible. HOWEVER, since clickers take a lot of discipline, patience and practice, maturity is the key factor; age maturity and shooting maturity. If you are disciplined and maintaining consistent form, then you are ready for a clicker.

Recently, one of my readers asked:

I just wanted to ask, with regards to the form, if I should be expanding my chest during the draw (pulling your shoulders back towards the spine) in order to activate the back muscles to take the load rather than the arms.

Shooting a clicker is a relatively simple process however; it requires the use of back muscles to create something called back tension. By compressing the rhomboid major muscles (between the shoulder blades and spine) together, it will draw the arrow past the clicker for the shot when you are at full draw.

First, you need to determine the ideal location for your clicker. Have a friend mark where the tip of the arrow is at full draw. This will be the initial starting location for your clicker. There are tons of clickers on the market however there are two basic types of clickers; riser-mounted or sight-mounted. Depending where the initial starting location is measured it will help you determine the type you need.

Once you have mounted your clicker follow this shot process.

  1. Nock the arrow, with the arrow under the clicker and on the arrow rest.
  2. Raise the bow and draw towards your anchor point.
  3. Continue to draw the arrow until the tip of the point is still just in contact with the clicker.
  4. Aim and while still maintaining, squeeze your rhomboid major muscles together.
  5. Once you hear the “click”, relax your fingers and finish the shot.

It is important that you are able to reach your anchor point at full draw. The clicker needs to be within the distance so your rhomboid major muscles can activate the shot. Remember, over the course of an entire day of shooting, your muscles weaken and you will have to work harder to draw the same amount, it may need to be adjusted to find the ideal location for entire day of shooting.

Important: Once you have determined your clicker location, leave it alone. Making any adjustments will affect all your sight marks, and they will need to be adjusted too.

If you have never used your rhomboid major muscles before this is going to take some time to master. Practice using your rhomboid major muscles with the following exercise.

With palms down and your forearms parallel to the floor, bring your fingertips together at chin level. Try squeezing your rhomboid major muscles together. You should witness your fingers spread apart about an inch. This is all the space you need to activate the clicker at full draw.

You can also check out this website for exercises to help develop strength in your rhomboid muscles.

The mastery of a clicker is essential for any competition archer. You will need to work on it regularly however once you master the process a clicker will become your best friend.

Arrows Series – Part 4: Spine, Flex and Stiffness

Before we discuss the topic of arrow spine, for proper safety and best performance, arrows need to match your entire bow setup. If you change draw weight, draw length, limbs, riser size, etc. this will affect you arrows. You may need to adjust the arrow length or require different arrows.

Arrow Myth:  An arrow is always straight.

Arrows SHOULD be perfectly straight when not in motion. However, when an arrow is released the force applied from the string causes the arrow shaft to be compressed against the resistant static weight of the arrow point and therefore bends.

Newton’s First Law of Motion: Every object in a state of uniform motion (rest) tends to remain in that state of motion (rest) unless an external force is applied to it.

Since the force applied is greater than the  resistance (weight of the tip), the arrow is propelled forward, and the shaft continues to flex and oscillate as it straightens itself. Arrow shafts that are either too stiff or too flexible will not fly well and will impact the accuracy of your shots or fail causing damage and/or injury. Therefore, we need to manage the flex properly so the arrow does not make any contact with the bow, or your arrow flight will be affected.

Important Tip: Arrow spine refers to the arrow shaft’s degree of stiffness (how much the arrow resists being bent) and is called spine deflection.

Basic Rule 1:  Shorter arrows act stiffer and longer arrows act more flexible.

Basic Rule 2: Powerful bows require stiffer arrows and less powerful bows require shafts that are more flexible.

Basic Rule 3: The heavier the tip equals greater the resistance, therefore the greater amount of compression.  So, a heavier tip causes the arrow to flex more and a lighter tip increase the stiffness.

According to the American Society for Testing and Materials (ASTM) the modern standards (ASTM F2031-05) an arrow’s official spine deflection is measured by hanging a 1.94 lb. weight in the center of a 28″ suspended section of the arrow shaft and is used for aluminum and carbon fiber arrows. (I believe original AMO standard has a basic guide to use for wood arrows spine determination and uses of 2 lb. and 26” section for standard measurement.) The actual distance the 1.94 lb. weight causes the shaft to sag down is the arrow’s actual spine deflection

For example, if a 1.94 lb. weight causes the center of a 28″ arrow to bend down 1/2 inch (.500″) the spine deflection would be .500″.  Stiffer arrows will bend less and more flexible arrows with bend more.

Almost every arrow manufacturer has its own numbering system and there are no universally agreed spine sizes among the various arrow manufacturers. Simply, the lower the deflection measurement equates to a stiffer arrow and higher the deflection measurement the more flexible the arrow. Manufacturers can number, size, and market their arrows anyway they want, as long as they provide the deflection data and test using the industry standard method.

Fortunately for us the engineers have already done the math for us and manufacturers provide spine selection charts. You are able to select an arrow based on your draw length and draw weight.

So when selecting arrows a good rule of thumb is that lighter draw weight, shorter draw length and/or lighter tip weight equals LESS arrow spine OR heavier draw weight, longer draw length and/or heavier tip weight equals MORE arrow spine.

Arrows Series – Part 3: Draw Weight

Obviously, force is required to move the arrow forward off the bow and it is generated from the tension of the limbs through the bowstring. Therefore, when purchasing arrows you need to know your draw weight so you can purchase the correct corresponding spine size for best performance. Limbs stiffness is determined by the amount of force, measured in pounds, required to draw the bow to a 28” draw length as outlined in the following Archery Trade Association (ATA) standard.

AMO BOW WEIGHT STANDARD

For Conventional Bows

Bow weight is the force required to draw the nocking point of the bow string a given distance from the pivot point of the bow grip (or the theoretical vertical projection of a tangency line to the pivot point parallel to the string). Draw length from pivot point shall be designated as DLPP and shall be referred to as TRUE

DRAW LENGTH.

For the purpose of uniform bow weight designation, bow weight is the force required to draw the bow string 26 1/4” from the pivot point. This weight will be marked on bow as being taken at 28” draw (26 1/4” plus 1 3/4” = 28”) See DRAW LENGTH STANDARD.

EXAMPLE: Weight Adjustment Range: 45/55 lbs. Weight Set At: 50 lbs.; Hold 32 lbs. Draw Length Range: 29” – 30”

EXPLANATION: The pivot point is a more realistic measuring point (when compared to the variations of profile of the back of bows at the handle section) for establishing bow weight since the pivot point is a constant in all bows as well as the contact point of the bow hand from which the true draw length is generated.

The 26 1/4” DLPP is the approximate equivalent of the 28” draw used previously on the more massive wooden handle bows.

Therefore, your draw weight is a combination of your draw length (See Arrow Series – Part 2 Measurements) and the combination of your riser (23” or 25”) and your limb stiffness (15#-50#).

For example, a 25” riser with a 34# long limb produces a 70” bow with a draw weight of 34 pounds at a 28” draw length.  If these same limbs were used on a 23” riser, the combination would produce a 68” bow with a draw weight of 36 pounds at a 28” draw length.

However, not everyone has 28” draw length, especially young archers whose draw length will change progressively with growth. So as a rule of thumb you can add or subtract approximately two pounds for each inch your draw length is over or under the 28” standard.

Using the previous example, if an archer has a 26” draw length and uses a 25” riser with 34# long limbs it will produce 30# of force at full draw OR uses the 23” riser with 34# long limbs it will produce 32#.

This is very important to select limbs that enable you to develop and compete however do not cause long-term physical damage. When purchasing limbs you need to determine if the limbs are too heavy, you can try this simple 7-second challenge.

7-second challenge

  1. Draw the bow to the anchor
  2. Hold seven seconds
  3. Let down without lowering your hands, stay in set-up position to take a 2 sec brake,
  4. Repeat several times.

If you cannot do it properly then the limbs are too heavy for you. If you find this challenge extremely easy, you can look at heavier poundage limbs, if you choose.

Now you understand draw weight and used in combination with your draw length you can see the arrows that match your equipment using a manufacturers arrow selection chart. In the up coming blogs we will try to examine the arrow spine, flex and stiffness.

Arrows Series – Part 2: Measurements

As we start to dive deeper about arrows, my goal is to simplify the information so young archers can have a good basic understanding; it is not meant to be all in compassing or a physics lesson, remember I am still learning too. Therefore, the next step is to understand how arrows are measured and how to determine draw length.

The Archery Trade Association (ATA) formerly the Archery Manufacturers and Merchants Organization (AMO) has the following standard for measuring draw length:

AMO DRAW LENGTH STANDARD

For Manufacturers

Draw length is a specified distance, or the distance at the archer’s full draw, from the nocking point on the string to the pivot point of the bow grip (or the theoretical vertical projection of a tangency line to the pivot point parallel to the string) plus 1 3/4”. Draw length from pivot point shall be designed at DLPP (Draw Length Pivot Point) and shall be called TRUE DRAW LENGTH.

EXAMPLE: 26 1/4” DLPP plus 1 3/4” is the equivalent of 28” draw.

For Dealers and General Use

For practical reasons not requiring precise terms, draw length is the distance, at the archer’s full draw, from the nocking point on the string to the back of the bow at the arrow rest.

EXPLANATION: The standard Manufacturers is consistent with the Bow Weight Standard as related to the pivot point. The DLPP plus 1 3/4” is compatible to previous concepts of draw length. Draw length for Dealers and General Use relieves the burden of preciseness not required for general use and facilitates determining arrow length. THIS STANDARD SUPERSEDES THE PREVIOUS STANDARD.

This can be technical and confusing, however with most recurve risers, the distance of the draw length pivot point (DLPP) to the front edge of the riser is 1 ¾”. Therefore, in general terms…

Your approximate draw length is equal to the distance from your string to the front edge of the riser at full draw.

You could use a measuring tape to measure this distance however unless you have a very consistent anchor point and good form you will have varying results, since you should measure several times. Therefore, any archer who is at the point they are fining tuning arrows for high-level of performance they should consult a professional. Otherwise, I would suggest you use the following simple method to determine your draw length.

Arms Length method

Using a ruler (or other straight stick), place one end in the “V” of your neck (where your neck meets your chest ) and relaxed, reach straight out until your palms touch the ruler. At the point for your fingers is your approximate draw length. Your arrows should always be at least 1” to 2” longer than your draw length for safety reasons and young archers often need to set their arrow length little longer ( 2” to 3” ) to allow for growth.

This gives you a basic understanding of draw length and how arrows are measured, however, things get very complicated for young competitive archers who are still developing and growing in size once you add-in arrow stiffness and flex, arrow cost, type of equipment and bow weight.

It is important to understand how things are measured so you can understand why you are using the arrows you have.  I highly recommend you visit your local archery professional for assistance.

Competition Baby Powder

This past weekend, I participated in the Ontario Spring Classic held at Woodlands Park in Toronto, Ontario. Toronto just happened to have very hot and humid weather during the tournament.

Heat and humidity can affect your arrow flight. Humidity can cause your arrows not to spin as quickly leaving your shot grouping lower since they do not gain as much distance. Heat affects the archer too with hot and sweaty hands. Sweaty hands affect your grip on the bow possibly changing your point of power and the heat causing your hands to swell which in turn affects your feel for the string in your fingers. Check out my previous blog about other effects of various weather conditions.

 Weather is a great metaphor for life – sometimes it’s good, sometimes it’s bad, and there’s nothing much you can do about it but carry an umbrella.  -Terri Guillemets

This year I packed baby powder, something that every competitive archer needs to bring with them to every outdoor competition.

A little baby powder on your…

…under your anchor point will help allow your hand ride along your chin smoothly

…inside of your string arm keeps your arm from becoming too sticky keeping your draw and release smooth.

…bow hand helps deal with sweaty hands that can affect your grip of the bow

… string fingers to allow your fingers to have a good grip on your finger tab making it easier to control your drawing and releasing of the string cleanly.

…cheek bones under your eyes, if you wear glasses or sunglasses, will help prevent them from fogging up.

The Ontario Spring Classic is a two-day tournament with high-performance archers including past, current and future Olympians hopefuls with the winner in each category receiving $500.00 prize money. This open tournament is a great way to measure your development against some of the best archers in Canada. If you are ready to take the next step in competition in Canada, I suggest you plan on attending next year and pack a little baby powder just in case.

Want to get better at Archery?

I have been asked by many people, how do I get better at archery? The answer is simpler than you think. Practice properly with expert guidance. Target archery is all about consistency since the target is not moving and you are in the same spot. The more consistent you are the better your scores will be.

If you want to get better then there are five areas of archery that deserve your attention.

Equipment

Ensure you have the right equipment for you. Find the right bow, proper mass weight and draw weight for you and your size. If you are unable to hold or draw the bow you are not going to be able to practice very long. Also arrows need to sized according to your draw/bow weight and draw length. Shooting arrows that are incorrectly sized will not perform well and will be very frustrating.

“It’s not the size of the dog in the fight, it’s the size of the fight in the dog.” Mark Twain

Form

Focus on consistent archery form, pay attention to the minor details such as your exact stance, exact hand position, your exact anchor point, etc. Replicating the exact same form every time will improve your performance and accuracy. Some people blame their equipment for malfunctions which can be true however more often than not it is your form. Focus on to your form not your equipment.

“There is no spoon … Then you’ll see, that it is not the spoon that bends, it is only yourself.”  Spoon Boy. The Matrix

Practice

Practice, Practice and when you are done practicing, practice some more. It takes thousands of arrows to make a difference.

“Practice is the best of all instructors” Publilius Syrus

Remember when practicing adjust one thing at a time until you have corrected it, and then work on the next thing.

Guidance

Nothing can replace proper guidance from a good certified coach with years of experience. Coaches are another set of eyes with knowledge to help you make those adjustments that will improve your shooting. So find a local archery shop and sign up for regular lessons.

“A coach is someone who can give correction without causing resentment.” John Wooden, basketball coach

Fun

Remember the reason you got into archery in the first place; it is fun.

“Just play. Have fun. Enjoy the game.” Michael Jordan